Showing posts with label Black. Show all posts

Thursday, February 28, 2013

Sci-Fi Makeup

Hey!

I'm doing makeup for a remake of a French movie, 'La Jetée'. It's a short film and I believe it will be screened at a local film festival. It's shot using stills which is really interesting. We're shooting tomorrow, so I've spent the last few days doing test runs of looks I wanted to use. There are some people from the future in it, so I get to do fun stuff! This is the one I did today:


I don't know yet if this one will be used at all, but I came up with a few different ideas and tried a lot of stuff out. I did some searching online for inspiration, and I came across a Youtube channel called BeautyARTStudio. This video in particular inspired this look - http://www.youtube.com/watch?v=WvlKnf4hCVc, This lady's looks are really cool. I'm not sure how to describe them, they look like high fashion looks. She uses a great technique for making shapes. It's a lot like when you define for a cut crease look, you drag the kohl and smudge it out. She uses eyeliner brushes for this and it makes the pencil easy to manipulate. You need a soft, smudgy pencil for this. I used Urban Decay Glide-On Pencil in Zero, it was great. I tried my Collection 2000 black kohl too but that didn't move as well as Zero. I used Sigma's E05 and E11. Here are some more pics:


I have some embellishments to add to this look when I do it for real tomorrow. I got some rhinestones and metal bits for decorating cards so I'll stick them on and try to make it really cool. I'll be contouring too and perhaps slightly altering the skin tone. I'm not sure what to do with the lips. I tried black and silver but I had to crop my mouth out of the photos because it looked super bad D: ! I was pretty stuck for time today, and I had to meet my sister not long after completing this. I had to make it 'wearable' because I didn't have time to redo my makeup :( This is the best i could do!


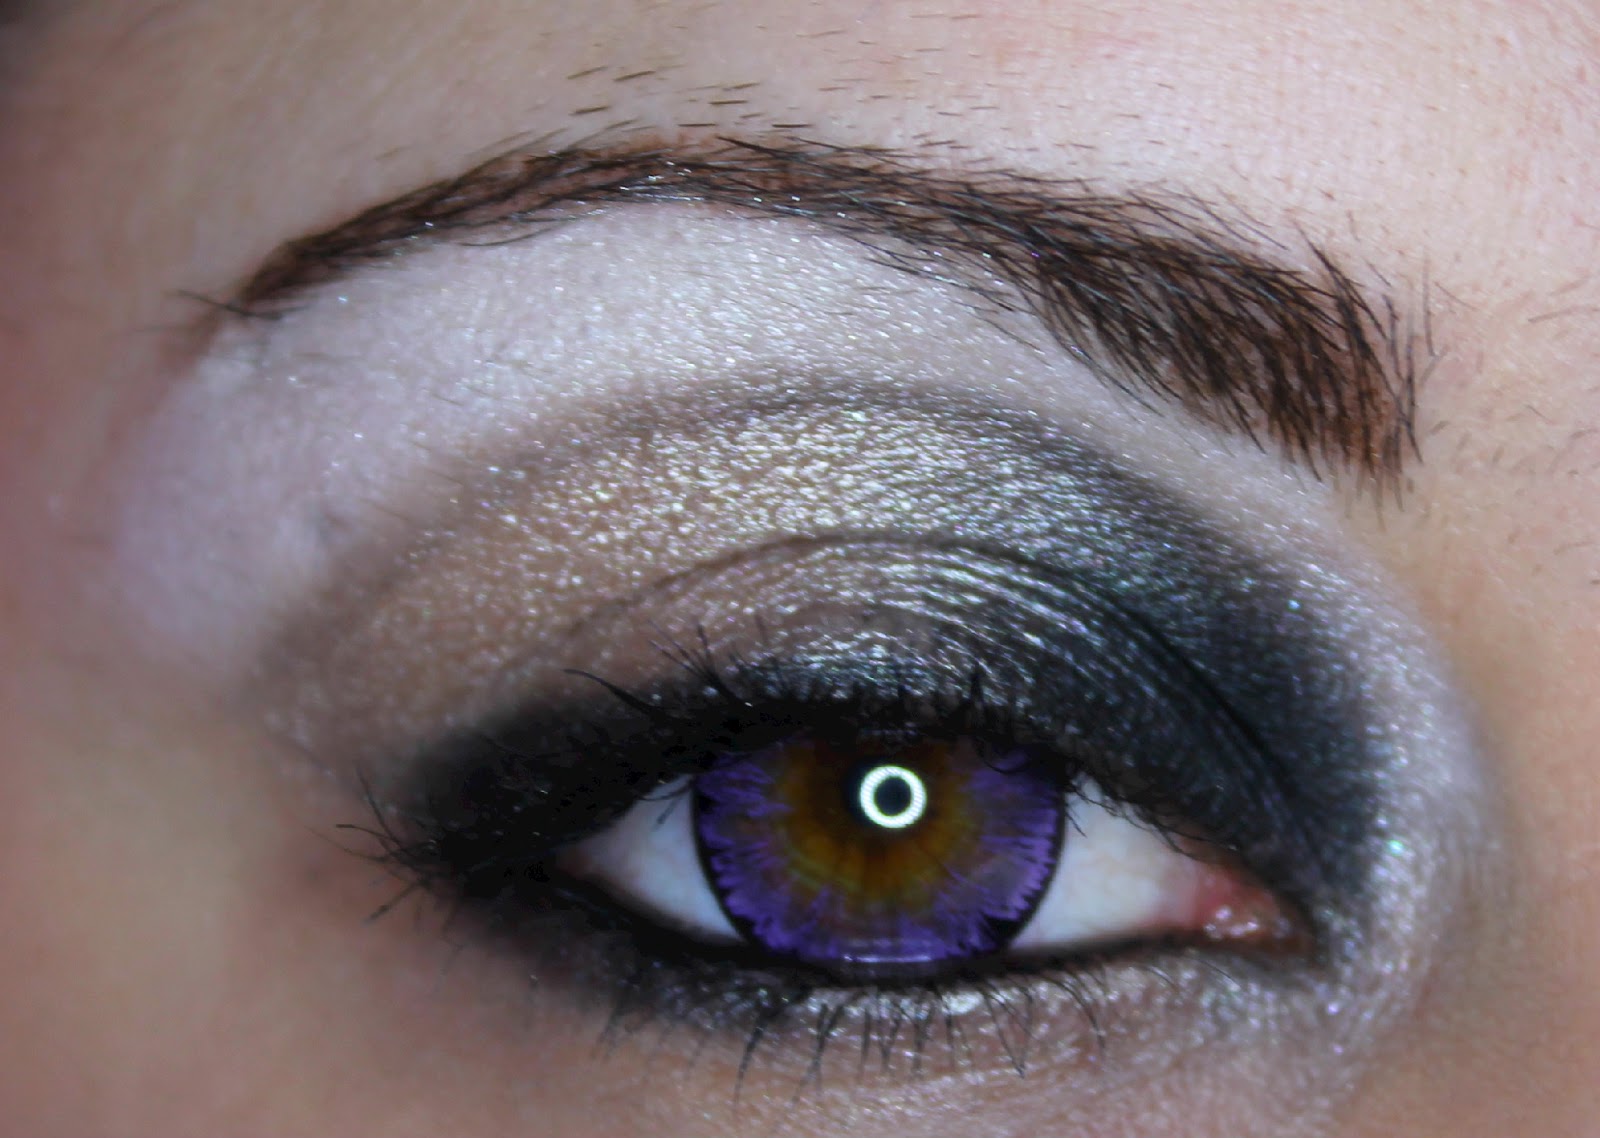
Sorry about my eyebrows again, oh god. I need to see someone about that. I took off some of the makeup around the eye and sort of made a cut crease. Hooray! My sister said it was nice so I guess it wasn't too bad. Here are some more pics and a product list, maybe some of you are feeling adventurous. I hope you enjoyed this slightly different look. See you soon! :D


Products used:

Face:

Maybelline BB Cream - Light

Soap & Glory Kick-Ass Concealer - Light
Maybelline Fit Me Powder - 120

Eyes:

Too Faced Shadow Insurance
Urban Decay Glide-On Pencil - Zero (great pencil for this dragging technique!)
Urban Decay Shadow - Verve, Blackout
Sugarpill - Tako

The Body Needs - Iced Diamonds
Maybelline Falsies Mascara
Essence Eyebrow Designer - Brown

Lenses:

EOS Ice Violet

Saturday, February 23, 2013

Another Face #4 - Jordan

Hi! :D

I did makeup on my buddy Jordan today, she was feeling colourful so I did a look using Sugarpill. I did contouring and stuff too, it was a practice session. Look how pretty!


I don't have a before shot, but I'll try to get one another time. I used liquid liner on her, normally I use gel liner on other people because it's easier to control. I think I'll stick with the gel liner for now, although I do want to become more proficient with liquid liner too. Doing it on myself is a lot easier, but then again all makeup application is easier on yourself! I think I'm doing more makeup tomorrow for someone and again Sunday for Jordan. She's going to a ball so she has to get fancy. I want to do something super sophisticated, I'll have to have a think. I'll look into some celebrity looks, red carpet stuff.

I have a film shoot coming up too that I have to prepare for. It's sci-fi so I have to come up with some pretty out there stuff. I have ideas though and I picked up some bits today to mess with. I also have an assignment that will be put off until last minute. I'm so busy lately! I quite badly need to find time to do my nails. Anyway, here's a product list for this look, see you soon!

Products used:


Face:

Revlon Photoready Primer
Stargazer White Foundation (Highlight)
L'Oreal True Match Foundation - Golden Amber (Contour)
Revlon Colorstay Foundation - Ivory
Soap & Glory Kick Ass Concealer - Light
Natural Collection Loose Powder - Translucent Neutral
NYX Blush - Silky Rose

Eyes:

Too Faced Shadow Insurance
NYX White Base
Sugarpill - Mochi, Buttercupcake, Acidberry, 2am, Tako
No7 Stay Perfect Liquid Liner - Black
Urban Decay Glide-On Pencil - Zero
Maybelline Falsies MascaraEssence Eyebrow Designer - Brown

Lips:
Essence Marble Mania Lip Gloss - Peach and Mix

Sunday, February 17, 2013

Sugarpill Blue & Green

Hey!

Another colourful eye look, blue and green this time. I'm crazy about Sugarpill lately! I'd love to get my hands on some more of their loose shadows too, I only have Goldilux but it's fab. I wore this look out to a party at a friends house last night. I paired it with clear gloss and Bourjois Blush Pot in Rose d'Or, keeping it toned down to show off the eyes. I can't find my eyelash glue but I wanted to wear false lashes too. I really need to practice applying them. Here are some photos and a product list! I'll post again soon with a product review or something hopefully for a change.


Products used:

Too Faced Shadow Insurance
NYX White Base
Sugarpill - Afterparty, Mochi, Acidberry, Tako
MUA matte eyeshadow shade 20 (black)
Urban Decay Glide-On Pencil - Zero
Maybelline Falsies Mascara
Essence Eyebrow Designer - Brown

Wednesday, February 13, 2013

Nail Art #5 - V-Day

Hey!

I've been crazy busy lately! I did makeup for a photo shoot on Sunday, it was an all day thing and I've been shattered ever since! It was a time for print job, I'm trying to get my portfolio started. I think it went well and I can't wait to see the shots when they're done, I'll definitely post some here for you all to see :)

I got some (more) new polish in the post this week :D I ordered some Nubar in Fire Sparkles, Petunia Sparkles and Violet Sparkles. They're gorgeous glitter polishes. I got them for about €8 on Beauty Bay. I also got the Seche Vite Dry Fast Top Coat for about €11. It's amazing :O It dries insanely fast, and gives the most beautiful shine. It gives incredible dimension to glitter polishes too. I really really needed to find this top coat. Doing my nails takes me way too long because nothing dries fast, it's a pain. I end up sat there with my hands in the freezer for ten minutes. If you're into nails and you don't have this, you need it. Trust me.
Seeing as Valentine's Day is coming I thought I'd attempt some V-Day themed nail art. I did a crap job but I tried! I hate tiny rhinestones :/ They're so fiddly! Here's what I managed anyway:

Crude Rhinestone Heart
Products used:

Sally Hansen Doubly Duty
Nubar Fire Sparkles
Seche Vite Dry Fast Top Coat
Black rhinestones from ebay

Thursday, February 7, 2013

Polish Haul and Black and Yellow Shatter Nails

Hey!

I bought so much nail polish :O Look:


Most of these were half price, and I wouldn't even feel bad if they weren't because I was on a spending ban for all of January and I rocked it :D These are the names from left to right!

Rimmel - Sunshine
Essence Cherry Blossom Girl LE - Fortune Cookie, It's Peach Not Cherry
Essence Vintage District LE - Vintage Peach, Get Arty, Antique Pink
OPI - Black Shatter

Catrice Million Styles Special Effect Topcoat - Shake it! Flake it!, Return of Space Cowboys, Have an Ice Day, Godfather of Pearl, ¿Holo Que Tal?!
Sally Hansen Complete Salon Manicure- Ivory Skull

I got the Catrice topcoats to do some more nail polish pendants with, they're all really cool! Here are some closeups of the bottles:

Sunshine, Fortune Cookie, It's Peach Not Cherry, Vintage Peach, Get Arty, Antique Pink

Shake it! Flake it!, Return of Space Cowboys, Have an Ice Day

Godfather of Pearl, ¿Holo Que Tal?!

Black Shatter, Ivory Skull

I did a manicure using Sunshine and Black Shatter! I'm really happy with how it came out, but the bottle of Sunshine I got is pretty crappy. Applied really streaky and took 3 coats to be opaque. I couldn't have worn it alone, it didn't look good at all and I don't think topcoat would have helped much. I was planning to use Black Shatter anyway, but I would've been cranky if I wanted to wear Sunshine alone. I got a massive chip on my thumb that I expertly concealed in the photo, but I don't think that's Sunshine's fault because all my other nails are still perfect. Have a look, I promise this is the last photo. See you soon!


Thursday, January 31, 2013

Nail Art #4 - Rainbow Gems

Hey everyone!

Sorry there hasn't been a post for a while, I've been sick for over a week so I haven't been able to wear makeup at all. I'm on the mend now though so soon I'll be back in action :) I did some nail art recently! It's a recreation of this look I saw on preen.me. My version isn't matte, although I may try a matte version one day since I have Essie's 'Matte About You'. This manicure took me quite a while, since those tiny gems are really fiddly! I got them on ebay for a couple of dollars, they're easy to find. These are 1mm gems. I've had them for a while but haven't used them much before.


Products used:

Sally Hansen Double Duty
Essence - Black is Back

Saturday, January 19, 2013

Another Face #3 - Keelin #2

Hey guys! My friend Keelin called round last night, she cooked us a super tasty dinner and then I did her makeup! It's another colourful and dramatic look. This time when she left mine she was going to a cousin's party in a house, so I laid off the glitter. Plenty of shimmer instead! I used some loose shadows by The Body Needs again, I had such fun with them on Thursday. I'm so happy that Keelin allows me to do dramatic looks on her. Some people can be really scared of trying new looks. 

Practicing on other people is helping me to improve my skill a lot. Keelin has different shaped eyes to me so I'm learning what sort of shadow placement suits her eye shape best by working on her. I feel like I'm able to apply makeup on someone else just as well as I am able to apply it to myself which is a big deal for me. When I took the makeup class I once did I had no idea to apply makeup to someone else, and I hadn't used brushes much. Needless to say I struggled for a bit, but now I'm feeling so much more confident. Here's the before and after shot, followed by some eye closeups and a product list. See you soon!


Products used:

Face:

Maybelline Dream Satin liquid foundation - FawnSoap & Glory Kick-Ass Concealer
Soap & Glory Trick and Treatment Under Eye Concealer
Maybelline Fit Me Powder - 120

The Body Needs Blush - Barely There Pink

Eyes:

Too Faced Shadow Insurance
Fyrinnae Pixie Epoxy
The Body Needs - Iced Blue, Pearl Blue Sky, Blackened Blue
Sugarpill - Afterparty, Tako
Inglot Gel Liner - 77
Benefit 'They're Real' Mascara
Essence Eyebrow Designer - Light Brown

Lips:

Essence Lip Liner - Satin Mauve
Essence Lipstick - Fairytale
Essence XXXL Shine Gloss - Pure Chic

Friday, January 18, 2013

Blackened Teal

Hey! I've been using a lot of palettes lately so I thought it would be nice to use some loose shadows for a change. I did today's look using some loose shadows by The Body Needs. They're one of my favourite brands, I have a ton of their glitters, blushes and shadows. Definitely check them out! The most prominent shade in this look is Blackened Teal. It's available alone or as part of the Blackened Collection, which contains ten shades. I swatched them before, check them out here. It's an incredible collection, especially if you're into smokey looks. See you soon, I hope you like my look!


Products used:

Too Faced Shadow Insurance
Fyrinnae Pixie Epoxy
The Body Needs - Beyond Teal, Blackened Teal, Iced Teal
Sugarpill - Afterparty, Tako
Urban Decay Glide-On Pencil - Zero
No7 Stay Perfect Liquid Liner - Black
Benefit 'They're Real' Mascara
Essence Eyebrow Designer - Brown

Sunday, January 13, 2013

Nail Art #2 - Pink and Black Gradient Nails

More nail art! I'm still keeping it simple, I attempted pink and black gradient nails today. They came out a little weird and messy but I still think they're pretty cool. I think I need a cosmetic sponge for this one, I used the rest of the kitchen sponge I used for my galaxy nails and I think the texture is too rough or something. I painted two coats of pink and sponged some black on the nails. I saw this method on cutepolish's youtube chanel. If you haven't seen her channel before go check it out, it's awesome! I want to do this gradient effect again, only better and in different colours. It looks really nice! Here's my manicure:


Products used:

Essence - Black is Back, Ultimate Pink

Wednesday, January 9, 2013

Nail Art #1 - Galaxy Nails

Hey guys, today I did some nail art! I don't have much experience with nail art and I'd like to try a lot of the cool stuff I see online. I've tried using dotting tools and I've used stickers before but that's about it really! One I've been wanting to try for a long time is a galaxy nail manicure, I'm sure most people have seen this one before. It's a very awesome and popular manicure, and very easy too! These are the polishes I used:


All polishes are Essence apart from the glitter polish which is from Revlon. Here's a rundown:

  • Galactic Black - Black with subtle silver shimmer.
  • White Tip Painter - This is the only white I own and I've never even done a French manicure. I will though, I promise!
  • Sleepy from the Snow White collection - A pale greenish blue with blue pearl.
  • Let's Get Lost - My favourite bright blue and the reason I started using base coats, it stains so bad!
  • Ultimate Pink - The name says it all.
  • Break Through - Lovely plum shade.
  • Passion for Fashion - Violet.
  • Revlon's Stunning -  Clear based polish with silver glitter reflecting multicoloured, irregular sized circular and hex glitter.

The basic idea is that you sponge colours over a black base, and work some glitter in to represent stars and planets. I used a cut up kitchen sponge because I had no cosmetic sponges, and I think it worked just as well. Revlon's Stunning is the perfect glitter for this manicure because of the different sized particles. They make for great stars in your miniature fingernail galaxies! I did a fair bit of searching for a polish exactly like this for this manicure, I was so happy when I came across Stunning. Another good glitter for this I've seen used by others is NYC's Starry Silver Glitter.

I really like how my nails came out! I'd like to do it again and try different colour combinations. I took a few pictures in a few different lighting conditions. It's hard to capture how cool this manicure looks in real life!

Natural light
Flash photo
Ring light
Ring light
Ring light

I will most definitely be dabbling more in nail art, I had a lot of fun with this. I'd like to do some gradient manicures too, the ones I see on other blogs look beautiful! We'll see what's to come ^_^

Saturday, December 29, 2012

This Week's Nails #13 - Jack Frost/Black is Back

Hey there! It's been a while, I've been crazy busy for weeks and had zero time, but I'm back to regular posting now. I hope your Christmas was as awesome as mine! I got some great gifts that I will review in the not too distant future :) Here is the manicure I did today:


I layered Models Own 'Jack Frost' from the Winter Wonderland collection over Essence's 'Black is Back'. I saw this combination somewhere before and I had to try it for myself, it's so pretty! 'Black is Back' is a nice black creme, opaque in two coats.


'Jack Frost' is a pretty glitter containing a myriad of blue and purple hues. I don't care for it much alone since it's quite sheer, but layered over other colours it looks great! The formula is SUPER thick and goopy, you need to scrape a ton of polish off the brush before you apply it or it will refuse to dry. This is the second time I've done this manicure on myself, the first time was quite bad since I layered 'Jack Frost' too thick and it ended up smudging really bad later on. Also, this glitter absolutely demolishes topcoat. It's a bit silly! I applied three layers of a topcoat here, two of 'normal' consistency and one very thick one. For about an hour or so my nails felt smooth, but now they feel rough again. I love the colours in the glitter but the particles have such beautiful dimension when they're smoothed and glossy, and it's a shame that's so hard to maintain that wet look. I took a blurred picture of this manicure too, to show off the glitter some more:


I'll leave it at that, but I'll be back again soon. Thanks for reading!

Monday, December 10, 2012

Gold Festive Look

Hey guys! Quick post on a look I did today. Everyone's posting festive looks so I thought I'd jump on the bandwagon :) Here's what I came up with:


Products used:

Too Faced Shadow Insurance
Fyrinnae Pixie Epoxy
Urban Decay shadows - Blitz, Echo Beach
The Body Needs shadows - Blackened Gold, Smoked Gold
TKB Trading mica - Forged Gold
Sugarpill - Tako, Goldilux
Inglot Gel Liner - 77 (matte black)
Urban Decay 24/7 Glide-On pencil - Zero
Essence Eyebrow Designer - Brown

Thursday, November 15, 2012

This Week's Nails #10 - Black Galaxy

Sorry it's been so long! I've been quite busy this week, I didn't really have a chance to get anything beauty related done :( Last night I decided I couldn't take it anymore and I did my nails!


Once again I've gone with my 'screw autumn' theme. It feels far too cold for all these warm reds and oranges that are still hanging around. I'm very cold, god damn it, and my nails will reflect that! This gorgeous shade is Isa Dora's 'Black Galaxy'. Black polish with silver glitter that reflects rainbow colours. I picked it up for €3.75, reduced from €7.50. A very good deal! Here's a close up:


After two coats the polish was opaque, but one layer of topcoat didn't suffice. I used three coats to completely smooth the polish and make the glitter look its best. The topcoat I used is quite thin, so perhaps just one or two coats of a thicker one would do. This is my second Isa Dora polish, I'm becoming a big fan of theirs!

Friday, October 5, 2012

Look - Glitter Glam

Hey people!
I wanted to share this look I did yesterday. There's a contest on Makeupbee at the moment by Lit Cosmetics, and I submitted this as an entry.


This is the first time I've used glitter on my lids. I have a good bit of eye safe glitter but I don't use it as much as I should! I think I did okay with the application. I probably could have applied some more actually. I wanted it to sort of blend out at the outer corner. There are a couple of parts I missed, that you can see when the eye is closed. I've been working on my shaping and blending too.  I have a tendency to over-blend and everything ends up smokey!


Here's the list of products that I used:

  • Essence 'I Love Stage' eye primer
  • Fyrinnae Pixie Epoxy
  • The Body Needs - Heliotrope
  • The Body Needs - Steal The Night
  • The Body Needs - Hot Pink (glitter)
  • The Body Needs - Iced Pink
  • Sugarpill - Tako
  • NYC Liquid Liner - Pearlized Black
  • Essence Kajal Pencil - Black
  • NYX Candy Glitter Liner - Hot Candy
  • Bourjois Volumizer Mascara
  • Essence Eyebrow Designer - Brown


I love glitter, I'll be using it a lot more from now on! It's so pretty ^_^
I'll leave more pictures below, and here's the link for this look on Makeupbee if you'd like to give it some luv! https://www.makeupbee.com/look.php?look_id=64235&qbt=userlooks&qb_lookid=64235&qb_uid=35317


Wednesday, September 12, 2012

Sugarpill Black and Purple Smokey Eye - Look with Tutorial

Hello! Sorry that I've been away for so long. I didn't have a camera for weeks. I was using a borrowed camera to take photos with, but the owner needed it. Luckily my family was awesome enough to get me a Canon EOS1100D for my birthday so I'm sorted now! I'm still terrible at photography but I'm working on it.

So my friend and Starcraft 2 team mate Michelle (MsCupcake) asked me to do a purple and black look for her. She said that when she tries it looks like someone punched her in the eye. Here's a tutorial to see if we can avoid that in future! :D

Product list can be found below the tutorial.

Step 1

Prime the eye. I used Essence's 'I Love Stage' primer, followed by NYX white eyeshadow base.  Don't forget to prime below the eye too, since shadow will be applied here.


Step 2

Apply purple shadow all over the lid. I used Sugarpill's '2am' 


Step 3

Apply black shadow to the outer V and crease. I used Sugarpill's 'Bulletproof'


Step 4


Blend the black up and out. Keep blending until the lines are gone and you get a smokey effect. Also blend it into the purple on the lid.


Step 5

Blend a little pink above the black. I used Sugarpill's 'Dollipop'.


Step 6

Apply white shadow to the brow bone and blend it with the pink. I used Sugarpill's 'Tako'. Also apply white to the inner corner of the eye. Then apply pink or purple liner to the lower lash line. Set this with purple shadow, and put some black shadow on the outer part of the lower lid. Blend these colours together.


Step 7

Line the waterline and upper lash line with black.


Step 8

Finish the look by curling the lashes and applying  mascara, I used Maybelline Falsies. Also fill in your brows, it gives the eye area more definition. I used Essence's Eyebrow Designer pencil and a dark brown shadow to do this.


I hope you found this tutorial helpful! If anyone has a look request, post a comment below and I will try to come up with a tutorial for you. The same goes if you have any questions about this look. Thanks for reading!

Product List:

Eyes:

Essence Eyeshadow Primer - 'I Love Stage'
NYX White Eyeshadow Base
Sugarpill Eyeshadow - '2am', 'Bulletproof' and 'Tako'
ELF Kohl Pencil
Maybelline Master Precise Eyeliner
Maybelline Falsies Mascara

Eyebrows:

Essence Eyebrow Designer - Brown
Sleek Au Natural Palette - 'Bark'