Hey! Since I got OPI Black Shatter, I also invested in the turquoise and white versions :O
They'll be useful for making pendants as well as being super awesome on my nails! I'm still obsessed with the Nubar Sparkles polishes I got and I wanted to use another one asap. I thought I might as well combine my two latest polish favourites and see how it goes. Also, I wanted to make the most ultra-colourful shatter manicure possible. I think the result looks really cool!
Products used:
Sally Hansen Double Duty Strengthening Base/Top Coat
Nubar Petunia Sparkles
OPI Turquoise Shatter
Seche Vite Dry Fast Top Coat
Hey!
I've been crazy busy lately! I did makeup for a photo shoot on Sunday, it was an all day thing and I've been shattered ever since! It was a time for print job, I'm trying to get my portfolio started. I think it went well and I can't wait to see the shots when they're done, I'll definitely post some here for you all to see :)
I got some (more) new polish in the post this week :D I ordered some Nubar in Fire Sparkles, Petunia Sparkles and Violet Sparkles. They're gorgeous glitter polishes. I got them for about €8 on Beauty Bay. I also got the Seche Vite Dry Fast Top Coat for about €11. It's amazing :O It dries insanely fast, and gives the most beautiful shine. It gives incredible dimension to glitter polishes too. I really really needed to find this top coat. Doing my nails takes me way too long because nothing dries fast, it's a pain. I end up sat there with my hands in the freezer for ten minutes. If you're into nails and you don't have this, you need it. Trust me.
Seeing as Valentine's Day is coming I thought I'd attempt some V-Day themed nail art. I did a crap job but I tried! I hate tiny rhinestones :/ They're so fiddly! Here's what I managed anyway:
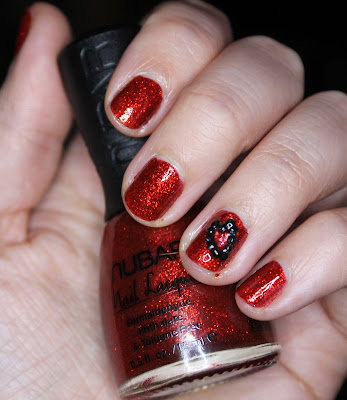 |
| Crude Rhinestone Heart |
Products used:
Sally Hansen Doubly Duty
Nubar Fire Sparkles
Seche Vite Dry Fast Top Coat
Black rhinestones from ebay
Hey everyone!
Sorry there hasn't been a post for a while, I've been sick for over a week so I haven't been able to wear makeup at all. I'm on the mend now though so soon I'll be back in action :) I did some nail art recently! It's a recreation of this look I saw on preen.me. My version isn't matte, although I may try a matte version one day since I have Essie's 'Matte About You'. This manicure took me quite a while, since those tiny gems are really fiddly! I got them on ebay for a couple of dollars, they're easy to find. These are 1mm gems. I've had them for a while but haven't used them much before.
Products used:
Sally Hansen Double Duty
Essence - Black is Back
Hey! I spent all weekend chilling out and not wearing makeup, but while I chilled I watched some nail art videos on Youtube. Today I did a manicure that I saw on PackAPunchPolish's channel, I thought it was really cool and I had to try it out. It's pretty messy because I've only used dotting tools once and I'd never used striping tape before. I like how it came out anyway! I didn't have a creme white polish so I used a pearl white instead but I think it looks alright. Here are some photos and a product list.
Products used:
Sally Hansen Double Duty Strengthening Base & Top Coat
Essence Colour & Go Polish - Sparkling Water Lilly, Enchanted Fairy, Oh My Glitter!
Essence Nude Glam Polish - Iced Strawberry Cream
No7 Stay Perfect Nail Colour - Vivid Violet
More nail art! I'm still keeping it simple, I attempted pink and black gradient nails today. They came out a little weird and messy but I still think they're pretty cool. I think I need a cosmetic sponge for this one, I used the rest of the kitchen sponge I used for my galaxy nails and I think the texture is too rough or something. I painted two coats of pink and sponged some black on the nails. I saw this method on cutepolish's youtube chanel. If you haven't seen her channel before go check it out, it's awesome! I want to do this gradient effect again, only better and in different colours. It looks really nice! Here's my manicure:
Products used:
Essence - Black is Back, Ultimate Pink
Hey guys, today I did some nail art! I don't have much experience with nail art and I'd like to try a lot of the cool stuff I see online. I've tried using dotting tools and I've used stickers before but that's about it really! One I've been wanting to try for a long time is a galaxy nail manicure, I'm sure most people have seen this one before. It's a very awesome and popular manicure, and very easy too! These are the polishes I used:
All polishes are Essence apart from the glitter polish which is from Revlon. Here's a rundown:
- Galactic Black - Black with subtle silver shimmer.
- White Tip Painter - This is the only white I own and I've never even done a French manicure. I will though, I promise!
- Sleepy from the Snow White collection - A pale greenish blue with blue pearl.
- Let's Get Lost - My favourite bright blue and the reason I started using base coats, it stains so bad!
- Ultimate Pink - The name says it all.
- Break Through - Lovely plum shade.
- Passion for Fashion - Violet.
- Revlon's Stunning - Clear based polish with silver glitter reflecting multicoloured, irregular sized circular and hex glitter.
The basic idea is that you sponge colours over a black base, and work some glitter in to represent stars and planets. I used a cut up kitchen sponge because I had no cosmetic sponges, and I think it worked just as well. Revlon's Stunning is the perfect glitter for this manicure because of the different sized particles. They make for great stars in your miniature fingernail galaxies! I did a fair bit of searching for a polish exactly like this for this manicure, I was so happy when I came across Stunning. Another good glitter for this I've seen used by others is NYC's Starry Silver Glitter.
I really like how my nails came out! I'd like to do it again and try different colour combinations. I took a few pictures in a few different lighting conditions. It's hard to capture how cool this manicure looks in real life!
 |
| Natural light |
 |
| Flash photo |
 |
| Ring light |
 |
| Ring light |
 |
| Ring light |
I will most definitely be dabbling more in nail art, I had a lot of fun with this. I'd like to do some gradient manicures too, the ones I see on other blogs look beautiful! We'll see what's to come ^_^


