Showing posts with label Green. Show all posts

Thursday, March 7, 2013

This Week's Nails #18 - Essence St. Patrick's Day Shatter Nails

Hey guys!

Sorry I've been AWOL again, I've been busy working on some projects. I've been getting some more time for print and unpaid work and I'm so happy! They've been loads of fun and I'm meeting lots of new people and gaining tons of experience.

I've done my nails three times this week. I got some stamping plates, so I've been messing with those. They're a bit tricky to use but I'll keep it up and be pro in no time :D I didn't photograph those manicures, they were cool to me because they were stamped but they were pitifully done!
My latest manicure is another shatter one, I can't get enough of them. I was in town recently and saw the Essence 'Oz the Great and Powerful' collection. There are five shatter colours in it! I got them all..They cost about €12 total and they're really awesome so it was well worth it! I'll do another post soon with swatches from them all so you can have a look.

I've seen some St. Patrick's Day manicure's around. Some of them are pretty cool, but most just don't appeal to me! Paddy's day isn't a big deal to me despite living in Ireland, so while I like the colour theme I'm not so fond of the leprechauns, pots of gold and flag colours. I wanted to do a themed manicure for this holiday but a more understated one, so I topped Essence's 'Walk on the Wild Side' with their 'Master of Illusion' shatter topcoat. I love the result!


'Master of Illusion' is a pretty colour. I'd call it jade green, but I've seen others call it aqua or turquoise. It is a little on the blue toned side. 'Walk on the Wild Side' is a deep green with grass green shimmer. The shimmer isn't that visible in this manicure though. Here's what I used, see you soon!

Products used:

Sally Hansen Double Duty Base/Topcoat
Essence - Walk on the Wild Side, Master of Illusion
Seche Vite Dry Fast Topcoat

Sunday, February 17, 2013

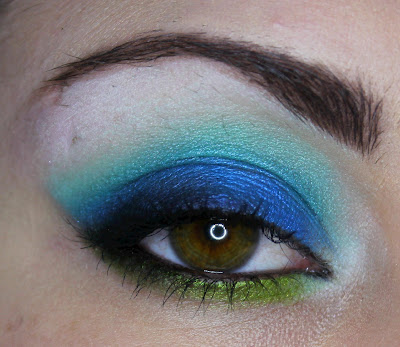
Sugarpill Blue & Green

Hey!

Another colourful eye look, blue and green this time. I'm crazy about Sugarpill lately! I'd love to get my hands on some more of their loose shadows too, I only have Goldilux but it's fab. I wore this look out to a party at a friends house last night. I paired it with clear gloss and Bourjois Blush Pot in Rose d'Or, keeping it toned down to show off the eyes. I can't find my eyelash glue but I wanted to wear false lashes too. I really need to practice applying them. Here are some photos and a product list! I'll post again soon with a product review or something hopefully for a change.


Products used:

Too Faced Shadow Insurance
NYX White Base
Sugarpill - Afterparty, Mochi, Acidberry, Tako
MUA matte eyeshadow shade 20 (black)
Urban Decay Glide-On Pencil - Zero
Maybelline Falsies Mascara
Essence Eyebrow Designer - Brown

Saturday, February 16, 2013

Sugarpill Green & Purple

I suddenly got colourful today. I got a sweet new Totoro t-shirt and it's green and purple, so I did some makeup to sort of coordinate with it. Ta-dah!


My eyebrows D: Eyebrow maintenance is the biggest pain. Purple brows might be cool with this look actually. I think coloured brows look odd on me though so it doesn't often occur to me to try it. Ooh, I got the Sigma Precision Eye Kit this week and it is so badass. The brushes are amazing, especially the crease brush and the blending brush. I'll review it at some point but I want to use them more first. So far I love them anyway! Here's another photo and a product list.


Products used:

Too Faced Shadow Insurance
NYX White Base
Sugarpill - Midori, Acidberry, Buttercupcake, Tako, Dollipop, 2am
Urban Decay Glide On Pencil - Zero
Maybelline Falsies Mascara
Essence Eyebrow Designer

Friday, January 11, 2013

FOTD#6 - GOSH Look #2

Hey! I did another look today with the GOSH palette from yesterday. This time I used the greens, I wanted to do a colourful look! I did a full face today, except shading. At least I highlighted this time.
Why do I look so angry? O_O
Some eye makeup shots!


I do like this palette. Again today some of these colours weren't so pigmented. These ones applied a lot better on my arms yesterday, maybe it's something to do with my lids? I'm not sure! The colours are nice though. I really feel like this palette would be amazing for bridal looks. The colours blend out so well and the looks appear soft and feminine. The colourful shades aren't so bright as to draw all eyes on you, they're awesome daytime shades. If you want your look a bit more dramatic, you can play it up with colourful liner like I did here!
I'll leave you with another photo and a product list, thanks for reading!


Products used:

Face:

Maybelline BB Cream - Light
Soap & Glory Kick-Ass Concealer
Soap & Glory Trick or Treatment Under Eye Concealer
NYX Blush - Silky Rose

Eyes:


Green - Lid | Red - Crease | Purple - Lower Lid | Blue - Highlight

Too Faced Shadow Insurance
No 7 Stay Precise liquid liner - Sky High
NYX Studio Liquid Liner - Extreme Coffee
NYX Jumbo Pencil - Peacock
Max Factor 2000 Calorie Dramatic Volume Mascara - Brown/Black

Lips:

Revlon Lip Butter - Berry Smoothie

Sunday, January 6, 2013

This Week's Nails #14 - Be Jeweled

I was a bit devastated to have to remove my manicure from last week that I loved (here). Luckily I got a couple of NYX polishes that I wanted to swatch! I decided on NYX's Advanced Salon Formula Polish in 'Be Jeweled', a pretty blueish green shade with lots of gold and green shimmer.


I hadn't used any NYX polishes before so I was really excited about trying this one. The brush is wide and a little shorter than others I've used which makes application really easy. It's opaque in three coats, and doesn't feel rough at all even though it's quite glittery. I only needed one layer of top coat with this manicure. Hopefully I'll be able to get some more of these!

Wednesday, November 7, 2012

EOS Ice Green Contact Lens Review w/ Gyaru Look

Hello! I wanted to post about my current favourite lenses. I got them about a month ago, from http://www.honeycolor.com/ for €15, postage was €5. I always get my lenses from there and they're great. I did an eye enlarging, dramatic gyaru style look to go along with them. I often do a really toned down of this look for daytime wear if I wear lenses. It's pretty much this look without lashes!

The lenses are 14.8mm and super enlarging. My natural eye colour blends nicely with the green, if the lenses were smaller in diameter they could look very natural. They're the most comfortable lenses I have. They don't distort your vision at all, you forget you're wearing them.

Products used:

Eyes:

Too Faced Shadow Insurance
Urban Decay Vice Palette - Echo Beach, Muse, Anonymous
NYC Liquid Liner - Black
NYX Jumbo Pencil - Milk
Essence Eyebrow Stylist Set

Lashes:

Cheap ones from ebay.

Monday, July 9, 2012

Review with Look! - Revlon Custom Eyes - Rich Temptations

Today I'm reviewing another Revlon product! The 3 for 2 offer is still on at Boots :)

There were a few different CustomEyes palettes available, they cost about €11. I picked up the one named Rich Temptations. I chose this one because it seemed to have the best variety of colours. It consists of 5 shadows, pictured below.

I really like the packaging! It's quite small too, perfect for taking in your purse. It's even small enough to fit comfortably in a clutch bag.
I did swatches of the shadows and everything for you! ^_^
The poor shadows don't have names, but they have numbers instead.

From left to right: 1, 2, 3, 4, 5

I swatched the shadows over NXY White Eyeshadow Base. I won't be swatching on bare skin at all on my blog. If you're not using an eyeshadow primer or base, you should be.
Each shadow has a satin finish, here's a short description of each:

1 - This one's a pale pink colour. Very pretty in the palette, but applies too sheer for my liking. I really wish this one were a bit more intense, as I really like pink shadows!

2 - This colour looks plum in the palette, but goes on a bit browner than you'd expect. It's still a nice colour though.

3 - A sheer champagne shadow. It's great for brow and inner corner highlight.

4 - A lovely moss green colour! I really like this one because I don't have another shadow quite like it in my collection.

5 - I was sort of disappointed with this one. In the palette it looks like a deep purple, but when you swatch it, it's closer to black. There are subtle purple undertones, but it's not what it appears.

A couple of the colours look a little too different swatched than they do in the palette. I was unimpressed with this to be honest. The colour payoff for the darker shadows is quite good, but for the paler shadows it's not great. I couldn't even build the colour up to make it more intense. I'm talking more about the pink in this case, as I can use the champagne for highlight.

On the back of the package, there's a sort of makeup tutorial! I thought this was quite cool, so I recreated it. I actually wish more products included pictures of look ideas!
The eyeball on the left is my eyeball! :D


Again I used NYX White Eyeshadow Base. The shadows are nice to work with. They apply and blend nicely and they look really good. The dark colours are strong enough that you don't need to pack them on heavily to get them opaque. Until I'd used the shadows to do this look with, I wasn't that impressed at all. Actually working with them and seeing how nice they are to use somewhat changed my mind about them. They lasted plenty long enough too. I wore mine for about 12 hours and it looked pretty much the same as when I applied it.

I finished this look with the following products:

  • NYC Liquid Liner - Black
  • Essence Kajal Pencil - Black 
  • No7 Intense Volume Mascara - Black
  • Essence Eyebrow Designer - Brown

To conclude, I like quite like this palette, despite my disappointment after swatching them. I'd be conscious of buying Revlon shadows without being able to test them in-store, though. Next time I'm in Boots I'll have a look at what other shadows they offer. I know they have Colorstay quad palettes so I might check those out, since the other products in the Colorstay line that I've tried are great.

I'll leave you with some more pictures of the look I did from this palette!