Monday, January 14, 2013

Urban Decay Vice Palette Look #2

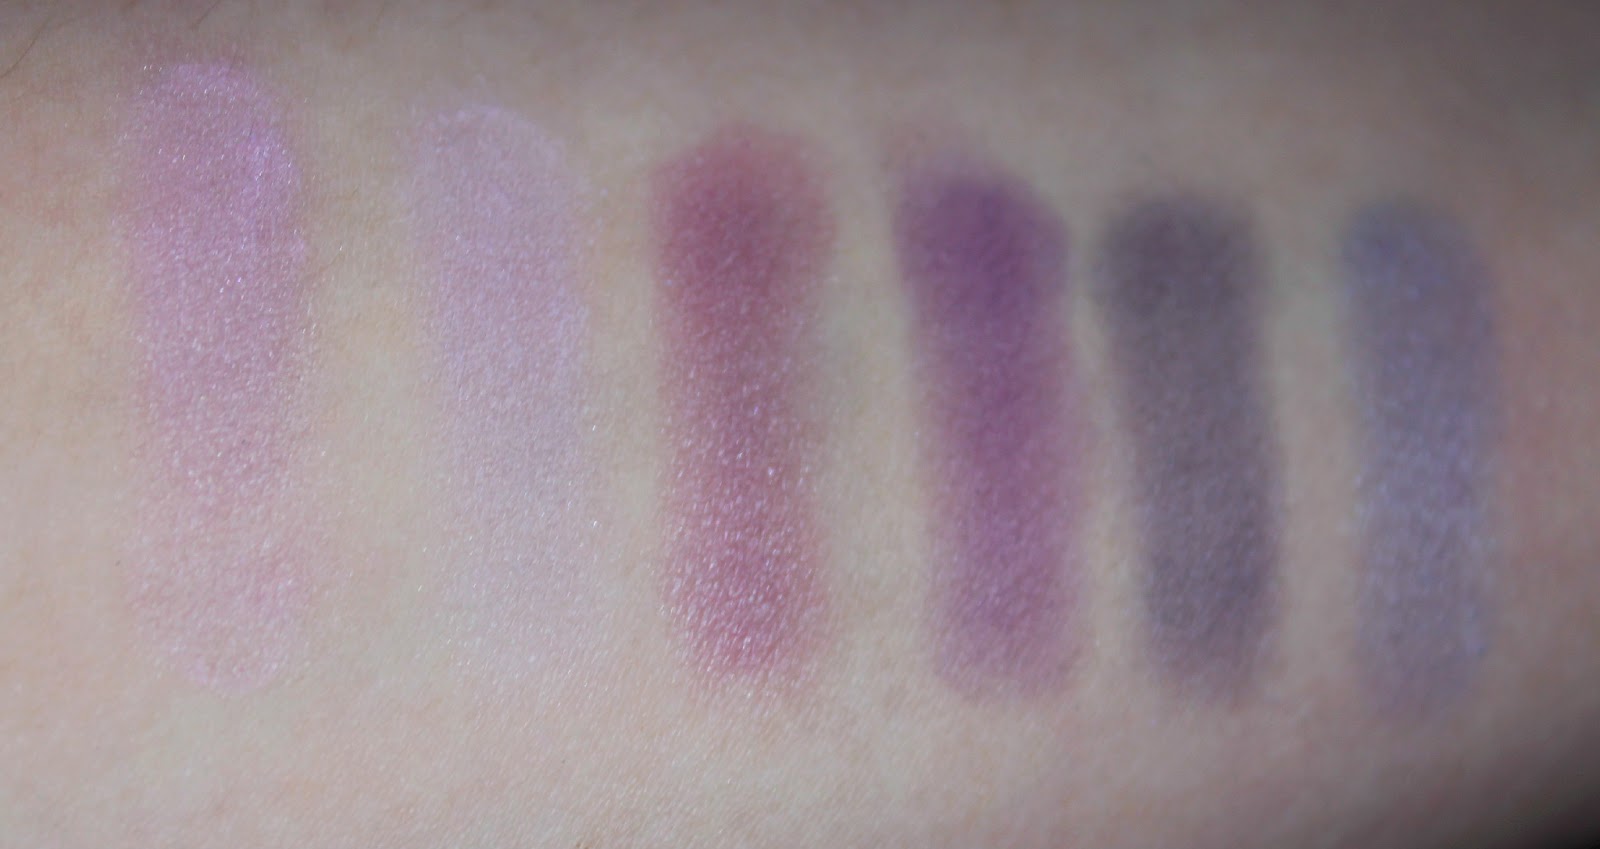
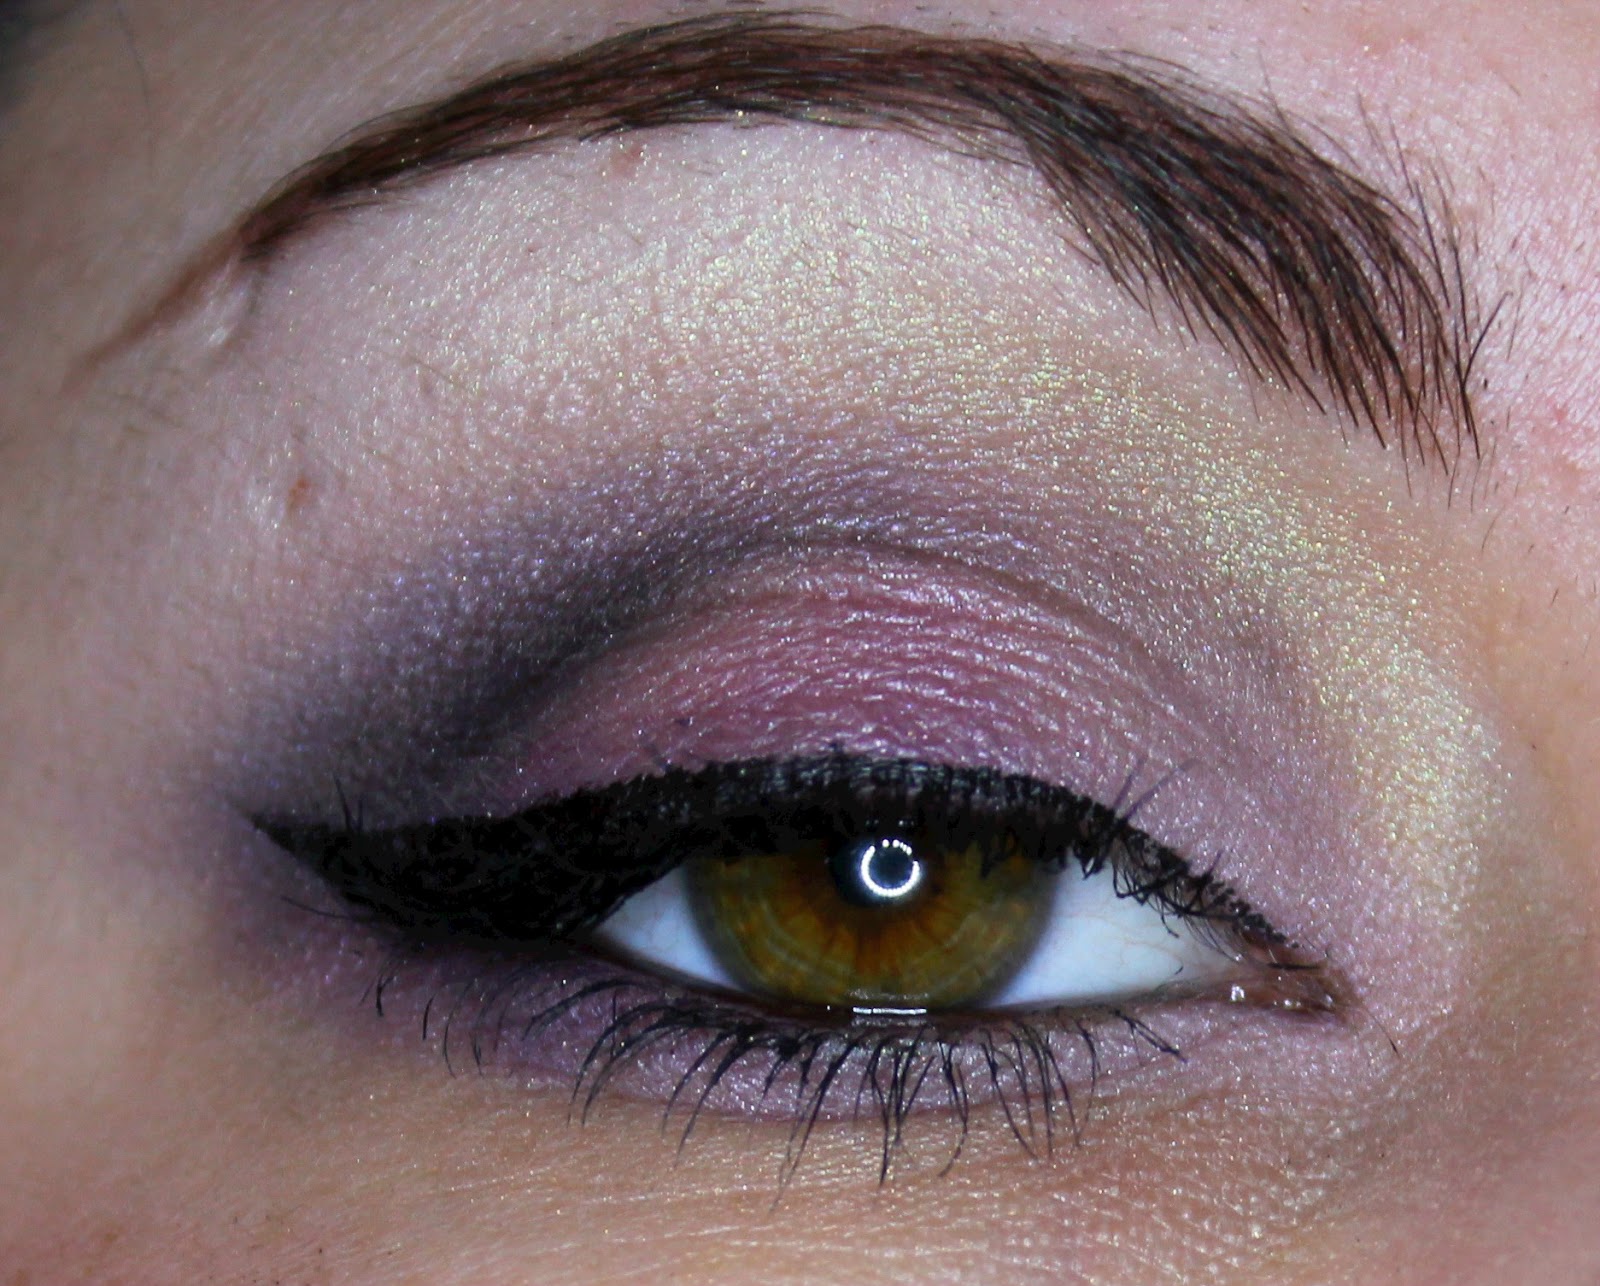
Hey! After using my Vice palette on Keelin Friday night, I remembered how awesome it is and vowed to use it more. There are some crazy awesome colours in there! I did a look with it today and I think it came out great! Take a look:


I didn't have much time today so this was a pretty quick look. I hope you guys like it! Do any of you have this palette? I don't see it used that much by many bbloggers, do you? I feel like if I saw other people using it more it would remind me to use it. My go-to palette is normally Naked 2, so Vice gets a little neglected. I really love this palette though, I need to use it a lot more. Here are some more photos and a product list! See you soon >_^


Products used:

Too Faced Shadow Insurance
Urban Decay Vice Palette - Unhinged, Rapture, Vice, Blitz, Laced, Anonymous
No7 Stay Perfect Liquid Liner - Black
Urban Decay Glide-On Pencil - Zero
Benefit 'They're Real' Mascara
Essence Eyebrow Designer - Brown

Sunday, January 13, 2013

Nail Art #2 - Pink and Black Gradient Nails

More nail art! I'm still keeping it simple, I attempted pink and black gradient nails today. They came out a little weird and messy but I still think they're pretty cool. I think I need a cosmetic sponge for this one, I used the rest of the kitchen sponge I used for my galaxy nails and I think the texture is too rough or something. I painted two coats of pink and sponged some black on the nails. I saw this method on cutepolish's youtube chanel. If you haven't seen her channel before go check it out, it's awesome! I want to do this gradient effect again, only better and in different colours. It looks really nice! Here's my manicure:


Products used:

Essence - Black is Back, Ultimate Pink

Saturday, January 12, 2013

Another Face #2 - Keelin

Tonight my friend Keelin called over and I did her makeup before she went out! She was going to a gig so I did colourful, dramatic party makeup with glitter.


Before, wearing only foundation

After

Both of those photos are unedited, just cropped. I think I did ok! I don't get to work on other people as often as I'd like so it's kind of hard to tell how I'm doing, but I like how the makeup came out. Still, I feel more confident working on people than I used to. Hopefully I'll get to work on Keelin some more in the future >_^ Do some different kind of looks and stuff. Let me know in the comments what you think of this look! I know it's pretty crazy but it's night out makeup, and glitter is so much fun! Here are some more photos and a product list, see you soon!


Products used:

Face:

Maybelline Dream Satin liquid foundation - Fawn
Soap & Glory Kick-Ass Concealer
Soap & Glory Trick and Treatment Under Eye Concealer

Inglot Transluscent Powder
The Body Needs Blush - Barely There Pink

Eyes:

Too Faced Shadow Insurance
NYX White Base
Urban Decay Vice Palette - Noise, Vice, Black Market, Provocateur
Sugarpill - Tako, Dollipop
Inglot Gel Liner - 77
Urban Decay pencil liner - Zero
The Body Needs Glitter - Superstar, Holo-Blue
Benefit 'They're Real' mascara

Lips:

Essence Lip Liner - Cute Pink
The Body Needs Lip Luster - Rumors

Friday, January 11, 2013

FOTD#6 - GOSH Look #2

Hey! I did another look today with the GOSH palette from yesterday. This time I used the greens, I wanted to do a colourful look! I did a full face today, except shading. At least I highlighted this time.
Why do I look so angry? O_O
Some eye makeup shots!


I do like this palette. Again today some of these colours weren't so pigmented. These ones applied a lot better on my arms yesterday, maybe it's something to do with my lids? I'm not sure! The colours are nice though. I really feel like this palette would be amazing for bridal looks. The colours blend out so well and the looks appear soft and feminine. The colourful shades aren't so bright as to draw all eyes on you, they're awesome daytime shades. If you want your look a bit more dramatic, you can play it up with colourful liner like I did here!
I'll leave you with another photo and a product list, thanks for reading!


Products used:

Face:

Maybelline BB Cream - Light
Soap & Glory Kick-Ass Concealer
Soap & Glory Trick or Treatment Under Eye Concealer
NYX Blush - Silky Rose

Eyes:


Green - Lid | Red - Crease | Purple - Lower Lid | Blue - Highlight

Too Faced Shadow Insurance
No 7 Stay Precise liquid liner - Sky High
NYX Studio Liquid Liner - Extreme Coffee
NYX Jumbo Pencil - Peacock
Max Factor 2000 Calorie Dramatic Volume Mascara - Brown/Black

Lips:

Revlon Lip Butter - Berry Smoothie

GOSH Eye Shadow Palette look and swatches

Hey! I picked up this GOSH palette on sale in a pharmacy just after Christmas. It was reduced to €14.99 from €28, and there are 22 shades in it. I'd never tried GOSH cosmetics before and I hadn't heard anything about them. I looked them up online briefly and learned that they're a Danish company. I picked the palette up since for the price and with this number of shades, I can get a good idea of what their shadow range is like! I don't see a whole lot of GOSH stands around here, I think I know of two. Like any other cosmetics enthusiast, I was curious and wanted to try them out. Here's what the palette looks like:


I like the packaging! The outer box looks great, it caught my eye in the store. Palette itself is matte black and quite small, it measures six inches across and four down. It's a pretty portable size and contains a decent sized mirror, definitely good for taking on trips.


Swatches, over Too Faced Shadow Insurance.


Row 1
Row 2
Row 3
Row 4
These colours are beautiful. The shadows are soft and just the right amount of crumbly when  you swirl your brush in them. Some seem better pigmented than others, though. The shimmer ones seem to have the best colour payoff. Some of the paler shades and mattes are just a little lacking in strength, but not to an off-putting degree. I did a look using mainly the pink and purple shades. Check it out!


These colours are really soft and pretty. With nude pencil on the waterline and maybe less dramatic liner, I think this would make a nice bridal look! I was wearing this as an evening look though so I added the black instead.

These shadows are very nice to work with. They blend extremely well, I was really impressed with that. I can really suck at blending pretty often, so it's always nice with a product makes that easier on me. This isn't a proper review since there are so many shades, I'm not sure I can get a fair idea of them all without wearing more of them. I'll most likely do another look too and then say whether or not I'd recommend it. So far it's looking quite good though, and I feel like I'll be even more impressed by the other shadows. Here are a few more pictures and product list. Sorry for the monster post! <3


Products used:


Green - Lid | Red - Crease | Blue - Highlight
Too Faced Shadow Insurance
No 7 Stay Perfect Liquid Liner - Black
Urban Decay 24/7 Glide-On Pencil - Zero
Benefit 'They're Real' mascara

Thursday, January 10, 2013

Makeup Geek Holiday Bundle review with look!

Hey! I got a gift you guys*! The crew at Makeup Geek asked me to choose nine shadows from their store to do some looks with, and I chose the Holiday Bundle. I'd been eyeing it in their store for ages, I was delighted when they asked me!! I'm super excited to try these shadows, I've been watching MUG videos for some time now and Marlena and Co. create some really awesome looks with them. I actually received these a while back, but I wanted to get a Z-Palette to photograph them in. Here's the Holiday Bundle in my cute new zebra print Z-Palette, and some swatches:
Still plenty of space left for more MUG shadows :3
Top Row: Preppy, Beaches & Cream, Gold Digger
Middle Row: Country Girl, Envy, Pixie Dust
Bottom Row: Mocha, Dirty Martini, Bitten
Swatched over TFSI
There are four shimmery shades and five matte in this collection. All these colours are beautiful! My favourite shades are are Gold Digger, Envy and Bitten. They're soft and have great pigmentation, and it was really hard to choose which shades to do a look with!


I decided to use Pixie Dust in the inner third of the eye. I love this colour so much, it's a beautiful vibrant chartreuse. In the center I placed Dirty Martini, and put Envy on top of that for more shimmer. On the outer third I used Bitten, and deepened it more with Mocha. I blended up toward the brow with Preppy and highlighted the brow with Beaches & Cream. I mirrored the eyeshadow on the lower lid and water line. I got the shadows to stick to the waterline by using NYX Jumbo Pencil in Milk.

I think this look came out great! The MUG shadows are soft and easy to blend, and I plan to pick up more when I have the funds! There are fifty-six shades available at the MUG Store in pans like I have or compacts. I would happily recommend these shadows to anyone! They're certainly among the best shadows in my collection. Here are some more shots of the makeup and a product list. Thanks for reading! >_^


Products Used:

Too Faced Shadow Insurance
Fyrinnae Pixie Epoxy
MUG Shadows - Pixie Dust, Dirty Martini, Envy, Bitten, Mocha, Preppy, Beaches & Cream
NYX Jumbo Pencil - Milk
No7 Stay Perfect liquid liner
Benefit 'They're Real' Mascara
Essence Eyebrow Designer - Brown


*Even though I got this stuff for free, I'd tell you if it was bad.

Wednesday, January 9, 2013

Nail Art #1 - Galaxy Nails

Hey guys, today I did some nail art! I don't have much experience with nail art and I'd like to try a lot of the cool stuff I see online. I've tried using dotting tools and I've used stickers before but that's about it really! One I've been wanting to try for a long time is a galaxy nail manicure, I'm sure most people have seen this one before. It's a very awesome and popular manicure, and very easy too! These are the polishes I used:


All polishes are Essence apart from the glitter polish which is from Revlon. Here's a rundown:

  • Galactic Black - Black with subtle silver shimmer.
  • White Tip Painter - This is the only white I own and I've never even done a French manicure. I will though, I promise!
  • Sleepy from the Snow White collection - A pale greenish blue with blue pearl.
  • Let's Get Lost - My favourite bright blue and the reason I started using base coats, it stains so bad!
  • Ultimate Pink - The name says it all.
  • Break Through - Lovely plum shade.
  • Passion for Fashion - Violet.
  • Revlon's Stunning -  Clear based polish with silver glitter reflecting multicoloured, irregular sized circular and hex glitter.

The basic idea is that you sponge colours over a black base, and work some glitter in to represent stars and planets. I used a cut up kitchen sponge because I had no cosmetic sponges, and I think it worked just as well. Revlon's Stunning is the perfect glitter for this manicure because of the different sized particles. They make for great stars in your miniature fingernail galaxies! I did a fair bit of searching for a polish exactly like this for this manicure, I was so happy when I came across Stunning. Another good glitter for this I've seen used by others is NYC's Starry Silver Glitter.

I really like how my nails came out! I'd like to do it again and try different colour combinations. I took a few pictures in a few different lighting conditions. It's hard to capture how cool this manicure looks in real life!

Natural light
Flash photo
Ring light
Ring light
Ring light

I will most definitely be dabbling more in nail art, I had a lot of fun with this. I'd like to do some gradient manicures too, the ones I see on other blogs look beautiful! We'll see what's to come ^_^